Thursday, December 31, 2009

MADELEINES AUX TRUFFES


I was in Paris about seven years back and spent a really terrific day with Paule Caillat and her Promenades Gourmandes cooking class and walking tour (there's a really cool video of her class at http://www.babelgum.com/3016113/paris-promenades-gourmandes.html -- but do note Paule is completely fluent in English). We met up early in the morning to shop the local markets: A couple of newlywed Americans, an Asian woman and a quasi-aristocratic type from Budapest who carefully explained that there's Buda and Pest, two cities united, and that one (which one? Buda? can't remember) is more socially significant than the other. Needless to say, she hailed from the correct side of the river. Not sure how that all came up. She actually cut out a little early, probably had pressing obligations to attend to at the embassy or something...


I can't recommend Paule's class highly enough. She's spirited, enthusiastic, a natural teacher and intuitive cook. She keeps up with the current Parisian trends, and introduced us to the then newly in vogue tonka bean (more about that another time). After marketing and preparing a wonderful lunch in her loft-style apartment, she leads a walking tour around Paris, stoping in at the most marvelous establishments, including the famed Dehillerin cookware shop, where she's well-known and obviously well-loved. And I'll never forget being invited down into the cozy, warm basement below the Poilane bakery, where this Mr. Clean-type guy in white short shorts, slip-on keds and one of those Frenchy blue striped bateaux-collared shirts baked those iconic round, hard crusted loaves. He never stopped smiling and the ancient room and equipment were astonishingly immaculate. Fun times.


Paule came to New York this December to host a Christmas in Paris cooking class. Madeleines aux Truffes (presented here). Chicken stuffed with truffles and foie gras. Gratin of winter vegetables with more black truffles. Freshly sliced black truffles dipped in olive oil for light snacking. And Paule's magnificent Caramel au Chocolat tarte which I'm going to post soon.


I made these in St. Louis this Christmas and they were very well received.

Madeleines aux Truffes
Madeleines with Black Truffles
6 T. powdered sugar
1 3/4 c. flour
1 t. baking soda
3 eggs
1/2 c. whole milk
1/4 t. salt
1 (4 oz.) stick of butter
3 T. black truffle oil
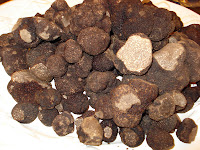
2 buck-eye sized black truffles, fresh is best but jarred will work well too
Any truffle juice accumulated in the jar


Beat eggs well until very frothy, and then beat in the milk.

Mix together the powdered sugar, flour, baking soda and salt and gradually add to egg mixture while beating. You want the batter to be very smooth.

Melt the butter on low power in the microwave -- ideally you want it barely melted, just really really soft with only part of it liquid. Not hot.

Slowly beat in the butter and the truffle oil (and juice if you have it).

Shave the truffles whisper thin on a truffle slicer (even the formidable OXO mandoline can't slice as thinly as true truffle slicer). Julienne the slices into thin thin strips. Collect up every little precious scrap and stir these into the batter.

Refrigerate the batter until it's very stiff. Three hours recommended -- though you can do an express chill in the freezer, just make sure to stir every five minutes or so, so it chills evenly. Paule says the chilled batter will expand better due to "thermic shock." I also have a theory that this additional time the truffles spend in the batter before baking allows the flavor to further permeate the batter. Another benefit is that the stiff batter is much easier to work with, at room temp it's pretty sticky stuff.

Preheat oven to 400 degrees.

Butter your madeleine trays -- regular size or minis. Fill each mold about 3/4 full. Bake the mini molds 10-12 minutes -- til they're puffed and golden brown around the edges. The larger size molds should take 12-15 minutes tops. Not too brown!

They should slide right out of the pan onto a rack. Best while still hot from the oven, though you can also prepare ahead and gently reheat before serving. They are pretty resiliant.

Tuesday, December 29, 2009

Oysters Rockefeller and Clams Casino


With
"Rockefeller" and "Casino" in the names of these two classics, I was going to go with a cutesy title for this post like Millionaires on the Half Shell, but that was a bit too twee, even for me. And these time honored classics really don't need any further gussying up. Oysters Rockefeller or Clams Casino served on their own are worthwhile endeavors.  But unite them on the same plate, piping hot and just the littlest bit crispy on top and you're well into Spectacularly Delicious territory.

Even though you can get fresh oysters year round (since there's been a relaxation of that "only in R months" rule) cold water oysters still taste best.  So O.R. is a seasonal recipe for me. On the other hand, our friend the sturdy clam is always at the ready to lend its briney goodness to chowders, pastas, the seduction of the deep fryer and of course C.C., so you can use this recipe anytime you'd like. 

There are many recipes for Oysters Rockefeller out there -- disregard any that call for cheese. And a complete reliance on spinach is disappointingly bland. Fennel bulb is the key to success here, wise advice first dispensed to me by the good ladies of the The Silver Palate cook books. The clam topping is relatively straight forward. You want the bread crumbs loose, buttery and toasty, not packed tightly as you would for a stuffed clam.  This is not the time to cheat and steam the clams open first -- it's essential to use freshly shucked clams so they are just barely cooked after their ride under the broiler.  Another important thing to note is you need a clam knife for the clams and an oyster knife for the oysters.  Beware anything billed as a combo oyster/clam opening knife -- these tools work equally poorly on both, if at all.

CLAMS CASINO
1 dozen freshly shucked cherry stone clams on the half shell
2 T. chopped parsley
2 garlic cloves minced
2 T. butter
2 T. best olive oil
pinch of salt, grind of pepper
1/2 t. red pepper flakes
juice of 1 lemon
1 c. seasoned bread crumbs
3 strips thick bacon

Saute garlic and red pepper in the butter and oil for two minutes. Stir in the bread crumbs, salt and pepper and saute one minute more.  Take off the heat and stir in the parsley and lemon juice.  Cut each bacon strip into four equal pieces.

OYSTERS ROCKEFELLER
(this topping recipe makes enough for 3 dozen oysters, so make more than the 1 dozen indicated or refrigerate extra for another night)

1 dozen freshly shucked oysters on the half shell
1 fennel bulb, roughly chopped
6 oz. fresh spinach, washed
4 scallions, chopped
1 T. whole grain French mustard
1 t. Tabasco
juice of 1 lemon
1 t. salt
1 t. pepper
1/2 t. dry yellow mustard
2 T. butter
1/2 c. seasoned bread crumbs

Boil the chopped fennel for eight minutes, adding the spinach for the last 30 seconds. Drain, run under cold water to stop the cooking and set the color.  In a food processor chop the fennel, spinach, scallions, butter, salt, pepper, wet and dry mustards, Tobasco, until it's a wet crumble. Add the bread crumbs and lemon juice, mix well.  You'll end up with a thick green paste.

On a pan large enough to hold all the shellfish lay out the clams and the oysters.  Top the clams with their breadcrumb mixture and lay a piece of bacon over each.  Spoon a good tablespoon of the fennel paste on top of each oyster -- you want the oyster peeking through under the topping.

Put the pan under a hot pre-heated broiler and broil until the oyster topping is starting to brown and the bacon is crisped. It takes about 10 minutes but you will want to keep an eye on things.

Serve hot out of the broiler with lemon wedges and extra Tabasco if desired. (I desire.)

Sunday, December 20, 2009

MRS. MERINO'S FRUITCAKE


The long-running
tradition of fruitcake-bashing seems to have abated somewhat of late.  Probably because the joke was beyond tired, it exhausted itself to death.  Throughout these dark years of ridicule, fruitcakes carried on, making their annual appearance and enjoying the appreciation of loyalists.  And yet, like so many other holiday treats, fruitcakes have become a commercial commodity.  I don't have any data to back this up (does anyone?) but I"ll guess the majority of fruitcakes you'll encounter this Christmas will be store-bought.

Which is a shame.

Mrs. Merino, a good friend of Steve's mom, has perfected her fruitcake recipe over many years.  This one stands out by the perfect balance of warmly spiced, moist cake studded liberally with, but not overwhelmed by, brightly colored candied fruit.  Commercial versions can err in either direction. Some bakeries, in ill-advised attempts to up the cachet (and price) of their product, will deliver a super abundance of fruit, so a slice resembles a stained glass window -- too sweet, too sticky.  At the other end of the spectrum you have the cut-corners version of dry cake with tiny freckles of fruit, lacking the required bit of chewiness and usually any flavor.

So a couple of Steve's notes before you dive into the recipe.  First, for good, juicy, flavorful candied fruit skip the wan, way over priced offerings found in most grocery stores and buy in bulk from an online resource. Steve has had great luck with nutsonline.com.  And don't be seduced by the promised convenience of cardboard bake-and-serve loaf pans.  They don't hold their shape well, so the sides kind of bow out, the "festive" decorations printed on the sides present an unappealing, pre-fab look, and the cake sticks to the sides of the cardboard pan.  No one's going to appreciate a fruitcake you have to dig out of a cardboard pan that looks suspciously like an end-aisle offering from Walgreens.  Use a conventioal metal loaf pan or mini-pan, run a knife around the edges to release the cakes from the pans and you'll have a perfectly shaped, ready to serve cake.


MRS. MERINO'S FRUITCAKE

1 lb. seedless raisins
1 c. currants
2 c. mixed candied fruit (red and green cherries, citron, lemon peel, orange peel), chopped
1 c. brandy

Mix all this together and let stand overnight

Next day, sift together:
5 1/2 c. flour
2 T. cinnamon
1 T. nutmeg
1 T. ground cloves
1/2 T. salt
1/2 T. baking powder

Add 2 c. pecans

Cream together:

1 1/2 c. butter
2 1/2 c. sugar

Add 6 eggs, one at a time

Add 1/2 c. molasses and beat well

Mix 1/2 c. flour to the soaked fruit and then mix that into the butter mixture.

Add this to the flour mix, alternating with 1/2 c. strong coffee

Grease 3 loaf pans or 8 mini-loaf pans, add batter, and bake 1 hr. in a preheated 275 degree oven. Then reduce heat to 250 and continue to bake another hour and 45 minutes for the full sized loaves, about one hour fifteen minutes for the mini-pans.

It helps to put a pan of hot water in the bottom of the oven to keep the air moist.

Let cool a little, run a knife around the sides of the loaves and then invert to release from the baking pans.

Thursday, December 10, 2009

PERSIAN GRAPEFRUIT MARMALADE


I met my friend Sherry Akbar at Good Housekeeping.  For the twice-annual High Point furniture markets, she, the decorating editor, and I, advertising/marketer, would be the two man delegation representing this 4.6 million circulation title as we toured all the show rooms, meeting up with teams of six, eight, 10 or more from other magazines (including my current employer, House Beautiful).  It worked out really well - two can maneuver much more quickly than a horde. She'd scout out her story ideas while I made the advertising contacts and then whoosh, on to the next.  

High Point is very spread out and for some unknown reason we always ended up staying in remote locations, reliably inconvenient and consistently dreary. So lots of driving time to chat, not even counting the times we got lost since we then had to focus on finding our way.

Sherry's family is from Iran and I was fascinated and charmed by her background.  Naturally we talked food, and in sharing my enthusiasm for canning, she mentioned her mother made a mean pink grapefruit marmalade.  I couldn't get enough of her ravishing descriptions of this silky blend of not too sweet, not too bitter marmalade she'd been brought up on.  Nothing else ever quite like it.  I had to have the recipe.

As could be predicted, her mom, Homa, kept it in her head.  The only way Sherry was going to get it was to visit mom down in D.C. and take notes, which are transcribed word for word below.

If you've ever made jams and jellies, you know how important precise measurements and timings are, and the heartbreak of a poorly set batch.   Full disclosure -- most of my fruit "syrups" or "conserves" (a great word covering any degree of liquid to almost-but-not-quite jelly or jam) were originally intended to be more solid. So I approached this recipe with trepidation, especially since it doesn't include the reassurance of commercial gelling agents like Certo or Sure-Jel.


Well this is just one of those miracle recipes.  Feel your way through it and you wind up with the most marvelous, luscious, jewel-toned marmalade.  I guess the pectin in the rinds is all that's needed for a reliable set. It's worked like a charm for me, even when I double it.  (Sterlized jars and lids plus a five minute boiling water bath if you're putting it up.)

HOMA AKBAR'S PERSIAN GRAPEFRUIT MARMALADE

2 large pink grapefruit
At least 3 cups sugar

- Take the skin and bring to a boil in water and boil for 5 minutes. (Do this three times to get rid of bitter taste)
- Chop the skin and place in a Cuisnart and chop again into fine little pieces also into mush
- Remove pulp from grapefruits and cover in the sugar in a large bowl for several minutes
- Combine with pulsed skin
- Pour mixture into pot and bring to boil and then simmer until thick -- this took us about 20 minutes, but may vary
- It becomes a thick sweet marmalade.

Monday, December 7, 2009

CHRISTMAS SOUP


We started making this soup -- well really two soups -- years ago.  It's pretty dramatic in its own right, though kids are especially impressed with the bright red and green soups sitting side by side in the same bowl.  Neither soup is especially difficult, what you want to keep in mind is making both soups the same thickness.  Thick soup works best and actually tastes best too.  Christmas is no time for watery soup!

Serving is easy.  Have both soup pots within easy reach, and use two equal sized measuring cups.  I've found graduated measuring cups with handles work well. I'm sure you'll easily find what works for you in your kitchen.


A festive crouton garnish is key. Plain white sandwich bread cut in small decorative shapes, sauted golden in butter are a snap. Not just pretty, the crips buttery croutons are a perfect topper.

SWEET PEA SOUP
2 T. butter
1 medium onion, chopped
salt and pepper
1/4 t. thyme
1 1 lb. bag frozen baby peas
pinch of cayenne
pinch of nutmeg
3 c. chicken broth
5 or so mint leaves
juice of 1/2 a lemon
1/2 cup cream

In a medium size pot, saute the onions in the butter 'til translucent, taking care to let them brown.  Salt and pepper well, add the peas, thyme, cayenne and nutmeg, three cups of the chicken stock and simmer for 20-30 minutes.  Let cool a bit then liquify the soup in a food processor with the mint leaves and the lemon juice. Return to the soup pot.  Bring the heat back up 'til nice and hot.  You're going to stir in the cream right before you're ready to serve.  You don't want to boil the cream.

ROASTED RED PEPPER SOUP
2 T. butter
1/2 onion, chopped
1 carrot, peeled and chopped
1 stalk of celery, chopped
2 12 oz. jars roasted red peppers (the plain ones, not marinated)
3 c. chicken broth
1/4 c. cream

In a medium soup pot, sautes the onion, carrot and celery til the unions are tranluscent and the carrot and celery are softened.  Drain the roasted peppers, chop them up a bit, add to the pot with the chicken broth and simmer for 20-30 minutes.  Let cool a bit, then liquify in a food processor. Return to the pot, bring the heat back up.  Again, don't add the cream until just before you're ready to serve.

Make the decorative croutons of bread sauted in butter.

To serve, mix in the cream and have both pots within easy reach.  Using two measuring cups, scoop up 1/2 cup of each soup, and gently pour into the serving bowls at the same time. Pouring the soup at the same speed from either side of the bowl results in the two colors meeting in the middle.  Garnish with the crouton and serve hot.

Merry Christmas!

Thursday, December 3, 2009

Enchiladas Suizas


If my time in Mexico City brings back memories of Olga Breeskin first, following closely after that are the sublime Enchiladas Suizas served at the popular chain Sanborns.
Owned by Walgreens, these classic drugstores had everything we needed -- reassuringly familiar brands plus introductions to all sorts of new things, bright shiny objects, treasures and oddities never imagined. Everything clean and bright and well-lit, giving off an aura of antiseptic efficiency. Sanborns was the source of my passion for Anfora Painted Bird dinnerware.  Seemingly ubiquitous in Mexico, I hardly ever see it up here other than some random pieces on eBay.  Hmmm, might that brilliant blue have been the result of a dash or two of lead in the glaze? I'm not using those plates anymore and all these years later I seem to have come away unscathed, so no matter. [THIS JUST IN -- SEE THE COMMENTS BELOW FROM HANS KRITZLER AT SANBORNS. The plates have been lead free since '88.... though I bought mine in '82 I'm not going to dwell on that.]


There was a Sanborns right across the grand Avenida de los Insurgentes so we went often.   Luckily, early on we discovered their Enchiladas Suizas and never ordered anything else but them again.  I'm sure a big part of the appeal was encountering the tangy taste of tomatillos in the salsa verde for the first time, combined with the richness of the cheese and sour cream.

In this recipe I use gallinas, a larger, gamier cousin of the common chicken for the filling.  They are staples at my IGA and I thought the chickens had more flavor in Mexico than what I'd grown up with. If you can't get your hands on a gallina, a regular chicken works fine.

ENCHILADAS SUIZAS
1 4-5 lb. gallina or whole chicken, cut into quarters
basics for stock: some carrots, celery, onion, bay leaf, peppercorns, a bouillon cube
4 oz. grated parmesan cheese
1 bunch finely chopped scallions, both white and green parts
4 oz. shredded sharp white cheddar cheese
10 - 12 corn tortillas
1 c. sour cream
radishes sliced thin and shredded romaine lettuce for garnish

1 lb. tomatillos, about 10-12 depending on size
2 long hot green chiles
2 jalapeno chiles
1 large white onion, chopped
2 T. olive oil
4 cloves garlic, smashed
1 bunch cilantro
2 T. toasted pepitas
2 T. toasted sesame seeds
1/2 c. cream

Gently poach the gallina or chicken with the stock vegetables in water to cover, 45 minutes to an hour, and let cool in the broth.  When cool enough to handle, remove the skin and bones and shred the meat.  Mix the shredded meat with the chopped scallion and the parmesan cheese, salt and pepper to taste.   Strain out the vegetables from the broth, skim off the fat and reserve.

Make the salsa verde:  peel off the husks of the tomatillos and place them on a baking sheet along with the chiles.  Put them under a hot broiler for 6-7 minutes until one side is well-charred, then turn everything over and char the other side too.  Remove from heat, let cool.  Rub the charred skin off the chiles, remove the stems and what seeds you can. Don't try to take the skin off the tomatillos -- just place them as they are with the chiles into a food processor and blend well.

In a skillet over medium heat brown the chopped onion in 2 T. of olive oil, this should take 10 minutes or so.  After 5 minutes toss in the smashed garlic cloves.  Salt and pepper the onions well, and when they're translucent and browned at the edges add to the tomatillo mixture in the processor.  Add the cilantro and the toasted pepitas and sesame seeds and process it all for a minute or two until everything is as smooth as it can be.  Now blend in 2 cups of the reserved stock.

Heat up a little oil in a skillet or a pan large enough to hold all the salsa, and when it's nice and hot pour in the salsa.  It will sizzle and scald, that's what you want.  Reduce heat and simmer for 30 minutes to blend all the flavors.   Remove from heat and stir in the 1/2 cup of cream.


Wrap the stack of corn tortillas in a dish towel and place on a rack over steaming water (not touching). Steam, covered, for one minute, then remove the pot from heat and let it sit for 15 minutes with the lid still on.

Spoon  a bit of the salsa over the bottom of the baking dish you'll be serving the enchiladas in.  Unwrap the tortillas -- the ones on the top and bottom will probably be too mushy to use so discard them if need be.  The interior ones will be soft and pliable.  Roll up each tortilla with a generous amount of the filling, and place seam side down in the dish.  Whether you make 8 or 10 kind of depends on the size of the dish, you'll figure it out.  Make them even.

Pour the remaining salsa verde over the enchiladas. (Save any salsa that might not fit in the pan, it's too delicious to waste.)  Bake for 30 minutes in hot 350 degree oven.  Take out of the oven, lay the shredded cheddar cheese in a stripe across the middle of each row of enchiladas, and return to the oven for 30 minutes more. After an hour the cheese will be melted and lightly browned, and any edges of tortilla poking up from the sauce will be browned and crisp too.

Dress the enchilladas with a stripe of sour cream over the melted cheese, garnish with a row of radish slices and shredded lettuce.  Bring to the table and serve on your most festive lead free plates. 
 

Monday, November 30, 2009

Nachos Olga


Olga Breeskin, the incomparable Mexican superstar ("Super Olga" and "La Numero Uno" to her legions of fans), parlayed her early success as a child-prodigy violinist into a fully (extremely fully) fleshed-out paragon of sensuality and excitement in live performance, television and film.  During the 1970's and 80's she held our neighbor to the south in her thrall with her Las Vegas-style extravaganzas, performing nightly to sold out crowds of Mexico City's cognoscenti and plutocrats.  Fresh out of college I won a place in Olga's spectacular "Super Olga Ochenta y Tres." YouTube is brimming with examples of Olga's splendor in action -- this link gives but a small glimpse of the depth and range of her artistry:   http://www.youtube.com/watch?v=YAyrfOB07UU

If Dame Nellie Melba was worthy of the Escoffier-inspiration Peaches Melba, and Luisa Tetrazzini secured her own place in culinary history (as previously noted here on Spectacularly Delicious), I ask you: does not Olga Breeskin deserve elevation into this pantheon of immortals as well?  And thus Nachos Olga has been born.

Building on a base of freshly-crisped corn tortillas or "totopos" (don't even THINK of commerically packaged taco chips!), Nachos Olga are crowned with voluptuous, home made gravlax cured in cilantro and tequila.  And jalapenos of course, in recognition of the heat her performances engendered. As her father was a Russian emigree, this felicitous union of cured salmon and crunchy tortilla celebrates the cultural convergance that allowed a gifted, young, classically-trained violinist to capture the hearts of Mexicans as their most beloved "vedette."

MEXICAN GRAVLAX
2 lbs fresh salmon filet cut in two equal pieces
1/3 c. kosher salt
1/3 c. sugar
1 T. pepper corns and 1 T. cilantro seeds, coarsely cracked in a mortar and pestle
1 bunch of cilantro
1 "mini" bottle of tequila (50 ml)

Mix the salt, sugar, pepper and cilantro seeds and spread evenly over the flesh sides of the two salmon filets.  Rub the cilantro bunch in your hands to bruise the leaves and lay them on top of one piece of salmon. Put the other piece on top of that -- flesh facing flesh -- and place in a plastic bag, the kind that seals completely.  Pour in the tequila, press out any extra air, and seal tightly.  Refrigerate for at least 3 days, turning every 12 hours or so. Remove from the marinade, wipe off the herbs and spices, remove the skin and cut into 1" chunks. The cured gravlax keeps well in the refrigerator for two weeks.

TOTOPOS
Slice 6" corn torillas into quarters and fry in medium hot oil until lightly browned, about a minute. Remove from oil, drain on paper towels, and sprinkle with a bit of salt while still warm.  Make as many as you think you'll serve, allowing at least four per person.

MEXICAN SOUR CREAM SALSA
1 c. sour cream
1/3 red onion, minced
1 T. pickled jalapeno, minced
small handful of cilantro, finely minced
1 T. fresh lemon juice
salt and pepper
Mix well.

NACHOS OLGA
On each totopo place a teaspoon of the sour cream salsa, top with a chunk or two of the gravlax, and garnish with an additional bit of pickled or fresh jalapeno. Serve immediately.

Olga's theme song is "Todos Queremos Ver a Olga" (Everyone Wants to See Olga) -- you'll have them belting out "Todos Queremos Ver a Nachos Olga!" in no time.

Monday, November 23, 2009

Pumpkin Popovers

Of all the many things I learned during my 12 year tenure at Good Housekeeping, perhaps the most lasting will be how the presentation of a perfect popover is guaranteed to make even the most fabulous meal -- breakfast, lunch, dinner -- even more so.  Their recipe for giant popovers (The All New Good Housekeeping Cookbook) cannot be improved upon.  But, given the season, I tinkered with it a little to come up with this variation.  In the picture you'll notice I served this with the Lemon Ginger Honey Jelly we did in the Hot Topics Canning Club post.  A perfect pairing.

PUMPKIN POPOVERS
4 eggs
1 c. milk
1/2 cup cooked pumpkin, canned is fine
3 T. butter, melted
1 c. flour
1/2 t. salt

Preheat oven to 375.  Generously grease eight 6-oz. custard cups or a popover pan. I've gotten best results with Pam. If using the custard cups you'll want to place them on a baking sheet for easy handling.

In a blender combine eggs, milk, pumpkin, melted butter, flour and salt.  Blend until smooth.  Distribute evenly among the custard cups or a popover pan.  Don't fill more than 2/3 the way full.

Bake at 375 degrees for 50 minutes. With the tip of a knife make a slit in the tops of each to release the steam, then bake 10 minutes longer.  Immediately remove popovers from cups (use a knife or small spatula if they stick a bit) and serve hot.

Pass the butter!  


Saturday, November 21, 2009

Cranberry Walnut Galette

If your Thanksgiving plans aren't already mapped out here's a little stunner of a dessert. Not overly sweet, the bohemian artistry of the freeform crust will distinguish it from all other pies, many of which will be store bought. Not that there's anything wrong with that.  I'm just sayin'...
CRANBERRY WALNUT GALETTE
12 oz bag fresh cranberries
1/2 cup light brown sugar
1 T. cornstarch mixed with 1 T. water
1 cup chopped walnuts
1 1/2 cups flour
1/3 cup plus 1 T. yellow cornmeal
1/3 cup sugar
salt
1/2 cup cold butter

Prepare the filling:  Put half of the cranberries into a sauce pan, add 1/4 cup water and 1/2 cup brown sugar and bring to a boil.  Once the berries have popped open, stir in the cornstarch/water mixture and boil a bit more until it all thickens up.  Take off the heat and mix in the remaining uncooked cranberries and the walnuts.  Set aside to cool.

Make the crust: In a medium bowl mix flour, 1/3 cup cornmeal, 1/3 cup sugar and 1/2 t. salt.  With pastry blender cut in butter until mixture resembles coarse crumbs. Sprinkle in four to five T. ice water, 1 T. at a time, mixing lightly until dough comes to together (dough will feel very dry at first).  Shape into a ball.

On a cookie sheet large enough to roll out a 13" crust yet small enough to fit in your fridge, sprinkle the remaining T. of cornmeal.  Place a dampened dish towel under the cookie sheet to prevent it from slipping while rolling the dough.  With a floured rolling pin, roll dough on cookie sheet into a 13" round. Then with a long metal spatula, gently loosen the dough from the cookie sheet so it doesn't stick.

Mound up the cooled cranberry/nut filling in the center of the dough, leaving a good 2-3 inch border of plain dough all the way around. Then fold the dough up and around the filling, leaving a 4" opening in the center.  It will definitely look home made. Refrigerate 30 minutes.

Brush the dough with the egg white and then bake in a preheated 425 degree oven for 45 minutes.  Take it out of the oven, let it cool a couple of minutes, then use that long metal spatula to slide the galette onto your serving plate.

The pastry for this pie comes from the Good Housekeeping Step by Step Cookbook.  They made a cherry galette -- though you could use this pastry and technique for any kind of fruit pie.  Peaches and blueberries woud be a nice mix.  If you use fresh fruit you don't need to cook it first as you do with cranberries.  So if you don't make this cranberry walnut version, keep this galette in mind for next summer.

Friday, November 20, 2009

Pumpkin Souffle


Pumpkin pumpkin everywhere!  It's funny that Halloween doesn't generate the gold rush of pumpkin recipes that Thanksgiving does, though it makes sense that carving one pumpkin is enough work with everyone's real focus being on their costume.  This year eight of us went as Freudian Slips -- boys and girls alike in women's slips (hilarious fun shopping for those), with tweed jackets, men's shoes and socks, and little stickers all over saying things like Ego, Id, Ask my Analyst.  Holding cigars because sometimes a cigar is just a cigar.
I digress.  The matter at hand is the small Thanksgiving dinner.  Next week we're going to brother Brendan's in Connecticut where there will be a full house with my four nieces and nephews, plus my sister-in-law Karen's family.  Fun.  But there have been other years when it's just been four people at our house, even once just the two of us.  Watching Macy's parade followed by turkey for two is just fine.  And you can prepare things that would just be unmanageable for a larger group.  Like this pumpkin souffle, which has to go from oven to table immediately. 

PUMPKIN SOUFFLE

5 large egg yolks
6 large egg whites (so yes one wasted yolk)
Butter or Pam cooking spray
2 T. grated parmesan cheese
4 T. butter
1/4 cup flour
1 1/2 cups milk, warmed
1/2 cup cooked pumpkin, canned is fine
4 oz grated sharp cheddar cheese
1/4 t. each of cumin, ground coriander, white pepper, cayenne
1/2 t. salt
2 T. pepitas (shelled pumpkin seeds)


Preheat oven to 325 degrees. Grease a two quart souffle dish and then sprinkle the parmesan all around the bottom and sides. 

Make the pumpkin and cheese sauce:  Melt 4 T. butter in a saute pan and when hot whisk in flour and cook over medium-low heat for one minute after it begins to bubble, whisking all the while. Whisk in the warmed milk gradually.  Simmer for three minutes, stirring all the while with a wooden spoon. Sauce will reduce and thicken.  Stir in the grated cheese, the pumpkin, the spices and the salt. Cook briefly until cheese is melted and everything is smooth and incorporated.  Remove from heat.

In a mixing bowl, whisk yolks well then whisk in 1/2 cup of the hot pumpkin cheese sauce.  Then whisk that mixture back into the sauce in the saute pan, whisking rapidly to prevent curdling.  Now pour all of this back into the mixing bowl.

Beat the egg whites until nice and stiff.  Fold a third of it into the sauce in the mixing bowl, incorporate well, and then gently fold in the remainder, taking care to not to stir it too much or else the whites will loose volume. 

Spoon this into the prepared souffle dish.  Run a spoon or a spatula through the mixture in circle about 1" from the rim -- this will make the middle part rise higher than the edges, adding to the visual impact of the all-important rising.  Sprinkle the peptitas over the top, they will float on the surface.

Bake in the preheated oven for 55 minutes, the souffle will be puffed up and golden brown. Take to the table immediately, you want to enjoy it while it's still inflated and nice and hot. 

I've also got a pumpkin popover recipe in the pipeline. Stay tuned.

Wednesday, November 18, 2009

Irish Apple Dulce de Leche Cake

Everyone should have a couple of reliable recipes for signature cakes and desserts.  This Irish Apple Cake first came into my life from Myrtle Allen's Ballymaloe House cookbook, published in 1990.  Steve and I visited the famous farm-cum-guesthouse-cum-restaurant outside of Cork a while back. Since I enjoyed the cookbook so much, filled with interesting recipes and stories from the Irish countryside, our luncheon at Ballymaloe and subsequent tour of the gardens was akin to a personal Irish Haj.

Our visit, and the cookbook, occured before the advent of the great dulce de leche craze.  As I'm not one to knock a good thing I thought perhaps a little cross-cultural, Ireland meets Latin America might work nicely. Turns out it's a splendid idea.  If there could be any criticism of the original recipe, it would be that to some tastes it might be a bit austere.  Adding a good dose of dulce de leche to the apple filling gives a nice sweet gooiness to the enterprise without overwhelming the original concept. I also added the apple slice fan to the top as well as the candied mint leaf garnish.  Myrtle's not big on showiness for its own sake in her recipes, though I don't imagine she'd greatly mind these little embellishments. 

IRISH APPLE DULCE DE LECHE CAKE
2 cups flour
3/4 t. baking powder
1 stick (1/2 cup) cold unsalted butter, cut into pieces
1/2 cup plus 2-3 T. sugar
2 extra large eggs, 1 of them beaten with 1 T. milk for a glaze
7 T. cold milk
2 tart cooking apples -- Myrtle recommends Rome Beauty or Bramley's Seedlings, which "break down in the required way to a white foamy mass when cooked."  Lucky you if you have a source for these heirloom varieties.  Sturdy, standard Granny Smiths perform admirably
6 generous T. dulce de leche
Coarse turbinado or cane sugar if you have it, if not another T. of regular sugar will do

Lightly butter a 9" pie plate. 

Sift the flour and baking powder together in a large bowl.  Cut in the butter until the mixture resembles course meal. Stir in 1/2 cup of the sugar.  Make a well in the center of the mixture and pour in the unblended egg, beaten, and the milk all at once.  Stir to make a very soft, wet, sticky dough that does not clean the sides of the bowl. With floured hands pat half the dough into the bottom and sides of the pie plate.

Peel and core the apples and slice half of one thinly, making enough slices to fan out around the top of the cake.  Cut the rest up into smallish (not tiny) chunks. Distribute the apple chunks evenly on the dough in the pie plate to within 3/4" of the edge then sprinkle the remaining 2-3 T. of sugar over the apples.  Drop the 6 generous blobs of dulce de leche in an even circle on top of the apples, not too close to the edge.  Moisten the edges of the dough with a brushing of the egg/milk glaze. 

Sprinkle a large dinner plate with flour and pat the remaining dough onto the plate, making a circle big enough for the top crust.  Invert the plate and the dough over the apples in the pie plate. Pinch the bottom and top crusts together, sealing well.  Gently press the apple slices into a fanned circle around the top of the pie, and make an X cut in the center of the ring to let steam escape.  Neatness counts.  Brush the entire top with the egg/milk glaze, and sprinkle with sugar.  I've got some really nice, course brown crystals of Hawaiian cane sugar that work well.  Simple sugar is fine too and lends the top of the cake a little sparkle.

Bake the cake in the middle of a preheated 350 degree oven for 45 minutes, when the dough will be golden and the apples will be tender.  The stick-a-toothpick into the cake test isn't a reliable measure here -- the apples and dulche de leche will always cling to the toothpick.  If you have any doubts leave it in for another 5 minutes, though I've always found 45 minutes to produce a thoroughly baked yet still moist cake.

Garnish with candied mint leaves if you have them.  It's not a tragedy if you don't and the relative simplicity of the unadorned cake is probably more in keeping with Irish reserve anyway.  Serve warm.  Perfect and complete as it is, no one is going to refuse a nice slathering of whipped cream so go ahead, live a little.

Voila! Irish Apple Dulce de Leche Cake Mit Schlag.  As fit for the General Assembly of the United Nations as it is for the ending of one your memorable meals.

Monday, November 16, 2009

Remains of the Day: Turkey Tetrazzini al Forno and a couple of other ideas too


With the big day looming it's not too early to start thinking about creative uses for the leftover bird.  A longtime family favorite is Turkey Tetrazzini.  I started with Mary Pat Sullivan's ur-recipe, tweaked a little here and there. The biggest change really is the title. Since this is a baked meat sauce, cheese and pasta concoction I want to preempt any allusion to the word "casserole."  Rich, creamy, full of turkey flavor and made from scratch it's earned the respect of the Italian designation al forno.  And though it's an American invention (most commonly credited to the chef at the Palace Hotel in San Francisco circa 1908 or so, where the Italian-born opera star Luisa Tetrazzini resided),Tetrazzini al Forno just sounds better.

Here's an important note -- keep the extra turkey fat that accumulates in the roasting pan and that will rise to the top of the turkey stock you'll be making from the remains.  It adds so much flavor to these recipes, more so than butter alone.  In addition to Tetrazzini al Forno, there follows a couple of other tasty suggestions to use all the wonderful turkey broth you'll wind up with after simmering the carcass with the standard aromatic vegetable flavorings. Don't forget the bay leaf! As a bonus there's an amusing anecdote from Mom telling how she acquired this recipe.

TURKEY TETRAZZINI AL FORNO

2 T. butter
1/2 red pepper
1/2 lb. Cremini mushrooms
4 cups leftover turkey meat, white and dark, pulled apart into bite-sized pieces -- pulled preferred to chopped for more rustic results
6 T. turkey fat (see note above)
4 T. flour
2 cups turkey stock
1 pint half and half
1 cup dry sherry
1 c. grated Parmigiano-Reggiano cheese, plus some extra for the topping
1 lb. good pasta -- I used an interesting and sturdy variety called Fiori.
1 package frozen baby peas
1/4 cup bread crumbs
1/4 cup slivered almonds
Salt and pepper to be added judiciously throughout the preparations

Chop the red pepper into nice smallish squares and thinly slice the mushrooms. Add the 2 T. of butter to a saute pan over medium heat and add the red peppers.  Give the peppers a couple of minutes head start, then add the sliced mushrooms and gently saute it all together for another five minutes.  Set aside.

Make the sauce:  heat the turkey fat in a sauce pan, and when nice and hot add the flour.  Boil this roux a minute or so, wisking all the while, to cook off the flour flavor.  Add the turkey broth, the half and half and the sherry, bring up to an easy boil, reduce heat a bit and simmer for three to five minutes.  Stir in the turkey meat and the cheese, making sure it's all well distributed and heated through.

Meanwhile boil the pasta just 'til al dente -- really al dente, like seven or eight minutes tops, it's going to cook more in the oven and you don't want it mushy. During the last minute of boiling add the frozen peas.  Drain well.

Now mix it together -- meat and cheese sauce, peppers and mushrooms, pasta and peas -- and place in a buttered two quart baking dish.  Sprinkle the top with the bread crumbs, some extra cheese and the slivered almonds. 

Into a preheated 375 degree oven it goes.  Forty five minutes should do it if everything is still pretty hot when you assemble it; an hour or a bit longer if things have cooled down.  It's done when the top is toasty brown and it's bubbling up around the sides.

So here's the story Mom sent with the recipe:

"It was Judy Cassilly's recipe (son Bob, sculptor - founder of City Museum) that we "published" in our recipe book "Not By Bread Alone" (title idea from Dan and artwork done by Bob Cassilly senior). The recipe book and taste luncheon, in which all the recipes in the book were served, was to benefit St. Henry's, an inner city parish we were assisting. ("We" mostly Holy Redeemer and neighbors in Webster Park).
We also had an ice skating party benefit at which we served hot rum punch BEFORE the ice skating - there were several accidents at the rink, most notably a broken arm. Despite the mishaps the party was deemed a big success! (We were so young)"

So back to your leftovers.  You're bound to have more turkey stock, at least some of the turkey meat and fat which is the foundation of another excellent Thanksgiving follow up, TURKEY RISOTTO.  Good thing here is that the stock and fat will do all the heavy lifting when it comes to flavoring the rice, so if you're running low on meat at this point not to worry, you really don't want a meat-laden risotto.  If you've had success with risotto before, Turkey Risotto is pretty much a no-brainer:  start with some of the fat to saute your onions, a bit of garlic or shallots, some mushrooms, then use that wonderful simmering stock as you stir, stir, stir the aborio rice. Thyme is an essential addition, fresh preferred, and lots of chopped parsley too. And more of that good Parmesan cheese.

Lastly, TURKEY SOUP.  My dear friend Trista's mother is Allegra Kent, the famed NYC Ballet prima ballerina.  Allegra once contributed her recipe for turkey soup to a special section we did at Good Housekeeping, along with this this photo from one of her celebrated roles, George Balanchine's Bugaku. Her caption was priceless:  "I bend over backwards to give my children a healthy bowl of soup."  She said her exact memories are vague and, “memory sometimes becomes hallucination…” but if she were to recreate the soup today she would do mushroom and barley if she had just a little turkey leftover and veggies and brown rice (cooked separately) if she had a lot of turkey.
Allegra is a very good cook. As a rule she hews to the healthy side, though she can whip up a killer apple strudel too.  She wrote down her recipe as she put one together at Thanksgiving many years back and as soon as that turns up I'll share it with you too.


Tuesday, November 10, 2009

Black and White Goat Cheese Bread Pudding

Sweet, rich and filling bread pudding is tough to hate, except for its unfortunate falling into the dreaded "enjoy only occassionally" category  -- or sometimes even venturing into the sadder "remorse" column.  So let's not dwell on that. 

Thanksgiving is all about the side dishes and this offering goes very nicely with all the traditional favorites.  The herbs echo the most popular dressing recipes, yet the rich creamy goat cheese takes this bread-based specialty in a whole new direction.  The black and white checkered effect created by the criss-cross layering of the two breads certainly stands out from its companions on the table.  When you think of it, there's a lot of flavor in the Thanksgiving meal but not a lot of geometry.  This is a statement in design, taste and creativity. Very memorable too.  You'll get high marks, and though we may not like to admit it, there's always a bit of culinary competition going on at Thanksgiving. You can bake it earlier in the day and reheat it before serving, it's pretty sturdy.  

BLACK AND WHITE GOAT CHEESE BREAD PUDDING

1 loaf good white sandwich bread
1 loaf sliced pumpernickel bread
4 extra large eggs
1/2 t. salt
1/2 t. pepper
1/2 t. herbs de provence
4 scallions, white part only, finely chopped
2 cups half and half
11 oz. goat cheese

For my 12" x 9" x 3" baking dish, I used 16 slices from each loaf. You may have to adjust up or down a bit to fit yours.  Trim the crusts and cut each slice into thirds - you'll end up with finger sized rectangles.

Mix eggs with salt, pepper, herbs and half and half.

Now the fun part.  First divide the goat cheese into four equal portions.  This will make it easier to distribute it evenly throughout the pudding.

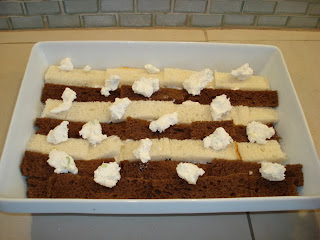
Next butter your baking pan well and then create alternating striped patterns with the black and white bread "fingers," with the goal of ending up with four layers in all. Create stripes the long way first, then cross-ways, then back to the long way.  On top of each layer add evenly spaced dollops of the goat cheese.  Pour some of the egg and half and half mixure over each layer.  You can start with less on the bottom, since what you add to subsequent layers is going to seep down.

Let the pudding sit so the bread can absorb all the liquid, at least 30 minutes, and in the fridge just to be careful. If you're leaving it in there longer cover with wrap so the top doesn't dry out.

Then bake for 35 minutes in a preheated 350 degree oven.

Creamy, tangy, rich and lovely.  Happy Thanksgiving!


Sunday, November 8, 2009

Hot Topics Canning Club


"Many hands make short work" is especially apt when embarking on a major canning project.  As we gear up for the feasts ahead -- and the numerous home made delectibles we plan to bestow so lavishly on friends and family -- it's neigh impossible to overfill your larder. So the Hot Topics Canning Club convened for a full day of productive preparations, both savory and sweet. 

Who's in the club? Our team at work is a wonderful group. As the days are unfailingly hectic, our secret to sanity is our daily group lunch.  Without fail, at the strike of noon we gather at the team meeting table.  After a cursory assessment of the various lunches, we launch into the main agenda: lively discourse on the Hot Topics du jour.  Mad Men and Gossip Girl are regularly recurring themes and Real Housewives of New Jersey earned its fair share of table talk.  But daily, without fail, food -- preparations past and future, family traditions, favorites and oddities and everything else imaginable is evaluated, laughed over, speculated upon.

So I invited the gang out for a day of peeling, chopping, juicing, grating, stewing, jar sterilizing and many many dips into the essential boiling water bath.  Three hours flew by and at the conclusion we'd put up a dozen jars of Lemon Honey Ginger Jelly, 20 jars of a fine and spicey Autumn Pear Chutney, and three dozen jars of Cranberry Rosemary Mustard. Recipes to follow.

In the photos that's Kerri at the pear prep station, Lauren bringing in her zested lemons for juicing, Lisa manning the boiling water bath and Elizabeth filling the chutney jars. Astute eyes will notice Elizabeth is due with twins in about four weeks, but no worries, we had plenty of boiling water and an ample supply of clean dish towels in the event of the unexpected.

A note about equipment: plenty of measuring cups and spoons goes without saying.  You'll  need large, non-reactive pots to cook the chutney and jelly and then the biggest pot you can manage with a rack on the bottom for the all-important boiling water bath. A good strong food processor. Ball's specialized home canning tools: the funnel that perfectly fits the jar openings, the wide ended tongs to lower and raise the jars from the boiling bath, the magnetic tipped wand to pluck the lids from the simmering hot water. 

CRANBERRY ROSEMARY MUSTARD
2 cups whole yellow mustard seeds (try Indian markets or online)
4-5 cups red wine vinegar
2 t. salt
2 cups dried sweetened cranberries
6 t. dried rosemary

Put the mustard seeds in a non-reactive bowl or plastic storage container, add the salt and cranberries, and cover with the vinegar. 4 cups should cover the seeds to start, but they soon start to absorb the liquid and swell up considerably. Continue to add vinegar so that the mustard seeds are just covered. Most of the swelling will happen in the first day.

The seeds and cranberries need to soak at least three days, covered, room temperature is fine, no need to refrigerate. Just keep an eye on it to make sure the vinegar just covers the seeds. And be prepared to use more than 5 cups. Don't sweat it, the important thing is that the seeds absorb as much vinegar as they want to.

After this good long soak, scrape the mixture 2 cups at a time into a food processor fitted with a sharp blade. (Sorry, a blender just doesn't work.) Process on high for 12 minutes (yes, 12 minutes). Then add 2 t. of the rosemary and process 3 minutes more.

You'll end up with a creamy mustard with some yellow seeds still visible. Process longer if you want a smoother mustard, less if you like it grainier. You'll always see some seeds unless you strain the mustard, which is a lot more trouble than it's worth. Texture = home made = good. 

Mustard keeps just about forever in the refrigerator, or for a longer shelf life process in sterilized canning jars and lids for 20 minutes in a boiling water bath.

Using whole dried mustard seeds gives this recipe some heat ensuring it will be a Hot Topic at your holiday table.

AUTUMN PEAR CHUTNEY
4 quarts roughly chopped pears (about 20). A mixture is good. Peel dark ones like Boscs. Light skinned pears such as Anjous needn't be peeled. You want firm pears. Luscious, soft and juicy pears ripe and ready for eating lack the sturdiness needed for chutney.
1 cup dried cherries
1 cup chopped onion
3 cups light brown sugar
1/4 cup whole yellow mustard seeds
2 T. peeled fresh ginger, finely chopped
2 t. salt
2 cloves garlic, minced
2 t. dried hot red pepper flakes
1 t. ground allspice
1 t. ground cloves
5 cups white vinegar

Combine everything in a large non-reactive pot. Bring to a boil, then simmer uncovered for 40 minutes, stirring occasionally so nothing sticks to the bottom of the pot. Ladle hot chutney into sterilized jars, leaving 1/4" headspace. Put on caps. Process 15 minutes in a boiling water bath.

This recipe makes 14 or more half pint jars.  Delicious right away and tastes better when it's had at least 2 weeks to meld all the flavors.

LEMON GINGER HONEY JELLY
(From Edon Waycott's Preserving the Taste)
2 1/4 cup honey
3/4 cup fresh lemon juice
3/4 cup fresh orange juice
1 T. lemon zest
1 T. orange zest
3 T. minced crystallized ginger, rinsed first to remove visible sugar
3 oz. commercial pectin (1 pouch of Certo)

Bring honey, lemon juice, orange juice, the zests and the ginger to a boil in a large non-reactive pot. When it's boiling good and well, add the pectin. Bring back to a full rolling boil and boil hard for exactly 1 minute, stirring constantly. Remove from heat, skim off any accumulated foam, and gently stir for a few minutes so the zest and ginger are evenly distributed.

Ladle into hot sterilized jars and seal. Seal and process in a hot water bath for 5 minutes.  Or you can do what's called the open canning method -- when the jars are filled and sealed, invert for five minutes and then turn right-side up.  This is how I've always done it and it works out just fine.

This recipe makes about 4 cups.

This has to sit for a couple of hours before it sets.  Don't get discouraged, it will get there.

Perfect on hot buttered toast and also a wonderful glaze for roasted or grilled chicken or pork -- apply in the final five minutes of cooking so it doesn't burn.